Our street has a four-way stop at the bottom of a hill. For about two weeks last fall, every time my wife’s SUV rolled up to that sign, the whole block heard it. A high, thin squeal right at the end of the stop. The neighbor’s dog started barking on cue. My wife started coming in the door with a look that said “your department.”
Brake squeal can be harmless, or it can be the car asking for pads before it starts chewing up rotors. The trick is telling which. Here’s my order of checks, starting with what you can see in your driveway with a flashlight.
Shop notes
- symptom: squeal while driving that stops when you press the brake. Likely cause: pad wear indicator touching the rotor.
- symptom: squeal only on the first few stops on damp mornings. Likely cause: light surface rust on the rotors.
- symptom: constant squeal at low speed stops with good pad thickness. Likely cause: glazed pads, missing shims or dry hardware.
- symptom: grinding or metal-on-metal noise. Likely cause: pads worn to the backing plate. Get it checked right away.
Step 1: Notice When It Squeals
Pay attention for a few drives before you pull a wheel. Timing tells you a lot.
- First few stops of the day, then gone: often surface rust or moisture. Usually harmless.
- While rolling, stops when braking: classic wear indicator sound. Plan pads soon.
- Only during light braking at low speed: high-frequency vibration between pad and rotor. Often hardware or glaze.
- After new pads: pads still bedding in, or hardware was reused or skipped.
- Grinding, not squealing: metal contact. Stop and inspect.
Also note whether it seems to come from one corner. Roll down the window in a quiet parking lot and listen at walking speed. A helper walking alongside can often tell front from rear, and left from right, faster than you can from the seat.
Don’t confuse brake squeal with a belt squeal from under the hood. If the noise changes with engine speed and not with braking, look at the serpentine belt instead.
Weather matters too. A car parked outside overnight in rain or heavy dew will often squeal for the first block or two. If the noise is gone by the time you reach the main road, and it doesn’t come back, it’s usually just the rotors cleaning off.
Step 2: Look at Pad Thickness
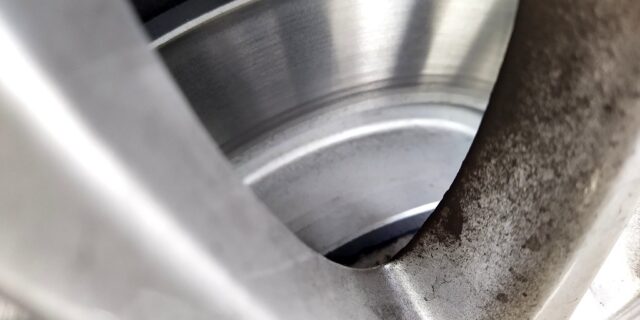
On many cars with open-spoke wheels, you can see the outer pad through the wheel without removing anything. A flashlight helps.
- Park on level ground, turn the steering wheel to get a better angle on the front calipers.
- Look at the pad friction material between the backing plate and the rotor.
- Compare it to the thickness of the steel backing plate.
If the friction material looks thinner than the backing plate, the pads are near the end. Your vehicle’s service information lists the minimum thickness. Many mechanics replace pads well before that minimum.
Check the inner pad too
Inner pads often wear faster than outer pads. A sticking slide pin can cause that. You usually need to remove the wheel to see the inner pad clearly. Do it on jack stands, not on the jack.
Look for uneven wear while you’re there. A pad that’s tapered, thicker at one end than the other, points to a caliper or bracket problem. A pad with chunks missing or separating from its backing plate needs replacing right away.
The wear indicator
Many pads have a small metal tab that touches the rotor when the pad gets thin. It’s designed to squeal. If you see a tab touching or nearly touching the rotor, that’s your answer.
Some vehicles use an electronic wear sensor instead, which turns on a dash light. Those sensors are often single-use. Plan on replacing the sensor with the pads.
Step 3: Inspect the Rotors
With the wheel off, look at the rotor’s friction surface on both sides.
- Smooth with a light, even finish: normal.
- Deep grooves you can catch with a fingernail: worn rotor, often from worn pads or debris.
- A raised lip at the outer edge: normal wear over time. A big lip can affect new pads.
- Blue or dark heat spots: overheating. Often linked to a sticking caliper or hard use.
- Heavy rust scale on the surface: common on cars that sit. Can cause noise and uneven braking.
Rotors have a minimum thickness, usually stamped on the rotor itself. Measuring it takes a micrometer. If the rotor is below spec, or the grooves are deep, replace it. Many shops replace rotors with pads today instead of resurfacing them, since many rotors are thin from the factory.
Look at the rear rotors too. Rear brakes on many vehicles do less work, so they can sit with rust on the surface. That rust band can cause noise on its own.
Step 4: Check for Glazed Pads
Glazing happens when pads get overheated and the surface hardens. It’s common after long downhill braking, towing, or riding the brakes. Glazed pads can squeal even with plenty of material left.
- A glazed pad surface looks shiny, smooth and hard, sometimes with small surface checks.
- The matching rotor often has a glassy or bluish surface.
- Braking may feel less grabby than before.
Some people sand glazed pads. I don’t trust that as a long-term fix. Glazing usually means the pad compound has changed. New pads, with rotors that are resurfaced or replaced, is the reliable cure. Then bed them in properly.
Ask why the pads overheated, too. If only one corner is glazed, a sticking caliper or slide pin is the likely reason. New pads won’t last if that isn’t fixed.
Step 5: Look at the Hardware and Lubrication
A lot of squeal comes from vibration, not wear. The pad buzzes in its bracket at a high frequency. Small parts control that vibration.
Parts that matter
- Anti-rattle clips or abutment clips: hold the pad in the bracket. Rusted or worn clips let pads move.
- Shims on the back of the pads: dampen vibration. Missing shims are a common cause of squeal.
- Slide pins: let the caliper float. Dry or seized pins cause uneven wear and noise.
Doing it right
- Use the new hardware that comes with quality pads. Don’t reuse rusty clips.
- Clean the bracket where the clips sit. A wire brush removes rust buildup.
- Lubricate the slide pins with a brake-specific lubricant that’s safe for rubber boots.
- Apply a thin film of brake lubricant to the contact points listed by the pad maker. Never put any on the friction surface or rotor.
- Torque the caliper bracket bolts and lug nuts to the specs for your vehicle.
On my wife’s SUV, the culprit turned out to be thin pads and one shim that had fallen off. New pads with fresh hardware and a proper bed-in ended the concert. The dog had to find a new hobby.
Step 6: Bed In New Pads
New pads and rotors need a bedding procedure. It transfers an even layer of pad material onto the rotor. Skipping it can cause noise, vibration and weak first stops.
- Follow the pad maker’s bedding instructions if they provide them.
- A common approach is a series of moderate stops from medium speed, without coming to a full stop.
- Do it on a safe, empty road with no traffic behind you.
- Afterward, drive a few minutes without heavy braking to let things cool.
- Don’t sit with your foot hard on the brake right after bedding. It can imprint pad material on hot rotors.
Before any test drive, pump the brake pedal several times until it’s firm. Pistons need to come back out after a pad change. The first press can go to the floor.
Check the brake fluid level after the job, too. Pushing pistons back raises the level in the reservoir. Top it off only to the full mark with the fluid type printed on the cap.
Related checklistCar Shakes When Braking at Highway Speed? What to Check
Tow or go?
| What you notice | Likely cause | Verdict |
|---|---|---|
| Squeal on damp mornings that fades | Surface rust on rotors | Go: normal, keep an eye on it |
| Squeal while rolling, stops when braking | Wear indicator on thin pads | Soon: replace pads within days |
| Grinding, metal on metal | Pads worn to the backing plate | Stop: drive only to a shop, carefully |
| Soft pedal, fluid leak or pulling hard | Hydraulic problem or failed caliper | Stop: have it towed to a professional |
When to hand it to a shop
- The pedal feels soft, sinks, or the brake warning light is on.
- You see brake fluid on the tire, caliper or ground.
- One wheel is much hotter than the others after a drive.
- Rotors are below minimum thickness and you don’t have tools to replace them.
- You’re not comfortable compressing caliper pistons or working on an electronic parking brake.
FAQ
Is brake squeal dangerous?
Not always. Morning rust squeal is normal. A wear indicator squeal means pads are near the end, so plan a pad change soon. Grinding means metal contact and needs attention right away.
Will ceramic pads stop the squeal?
Ceramic pads are often quieter than semi-metallic pads, but noise also depends on hardware, shims and rotor condition. Use a pad that suits your vehicle and driving.
Can I spray something on the brakes to quiet them?
Never spray lubricants or anti-squeal products on rotors or pad friction surfaces. Use brake cleaner for cleaning, and apply anti-squeal compound only to the pad backs as directed.
Do I need new rotors every time I change pads?
Not always. If rotors are above minimum thickness, smooth and true, they may be reusable. Many shops replace them anyway because resurfacing leaves them thin.
Pit-Stop Summary
The 30-Second Version
- Note when the squeal happens: morning only, while rolling, or while braking.
- Check pad thickness on both inner and outer pads.
- Inspect rotors for grooves, heat spots and minimum thickness.
- Replace glazed pads and use new clips, shims and proper lube.
- Bed in new pads, and stop driving if the pedal goes soft.