The first code reader I ever owned came in a blister pack from a checkout aisle. I bought it because my pickup’s check engine light came on during a road trip, and the nearest town had one parts store that closed at five. I sat in a motel parking lot with a flashlight in my teeth, found the port, and read a code for a small evaporative leak.
The fix that night was tightening a gas cap I’d left loose at the last fuel stop. That cheap tool has paid for itself many times since. A scanner won’t tell you what part to buy, though. It tells you where to start looking. Here’s how I use one, step by step, so you get real information out of it.
Shop notes
- symptom: scanner won’t power on. Likely cause: blown fuse for the diagnostic port, often shared with the cigarette lighter or power outlet.
- symptom: scanner powers on but won’t link. Likely cause: ignition not in the run position, or the tool doesn’t support that protocol.
- symptom: light is on but no codes show. Likely cause: code stored in a module the basic tool can’t read, such as ABS or airbag.
- symptom: code comes back after clearing. Likely cause: the fault is still there. Clearing only erases the record.
Step 1: Know What a Cheap Scanner Can and Can’t Do
Most cars and light trucks sold in the US since the 1996 model year use OBD2. That standard means any basic scanner can read engine and emissions codes. That’s the job a budget tool does well.
What most basic tools handle
- Reading stored and pending engine codes.
- Clearing codes and turning off the check engine light.
- Showing freeze frame data on many models.
- Showing readiness monitors, which matter for emissions tests.
What usually needs a better tool
- ABS, airbag, transmission or body module codes on many vehicles.
- Live data graphing, though many inexpensive Bluetooth adapters with a phone app do offer live data.
- Programming, relearns and service resets.
So if your ABS or airbag light is on, a basic engine code reader may show nothing. That doesn’t mean there’s no fault. Airbag problems in particular belong with a professional.
Handheld or Bluetooth?
A handheld reader with its own screen and cable is simple and always ready in the glovebox. It doesn’t depend on a phone, an app or a subscription. A Bluetooth adapter is small and often shows more live data through an app. Some apps lock features behind a paid upgrade. Either type will read engine codes. Pick the one you’ll actually use.
Step 2: Find the Port and Plug In
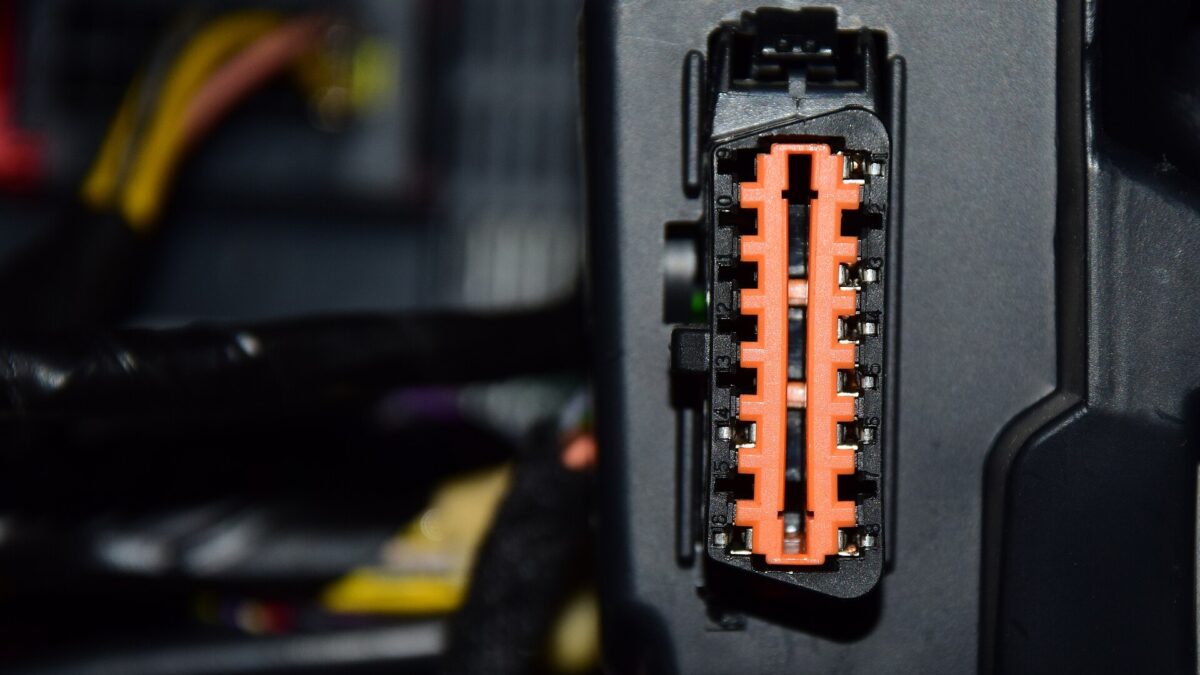
The diagnostic port is a 16-pin trapezoid-shaped connector. On most vehicles it’s under the dash on the driver’s side, near the steering column or above the pedals. Some hide behind a small cover or near the center console. Your owner’s manual will show where it is.
- Turn the ignition off.
- Plug the scanner in firmly. The connector only goes one way.
- Turn the key to the run position without starting the engine. On push-button cars, press the button without your foot on the brake.
- Follow the scanner prompts to link. Some tools ask for the vehicle make, year or engine.
If the tool doesn’t light up, check the fuse that feeds the port. It’s often the same one as the power outlet. A phone charger that stopped working is a good hint.
If it powers up but won’t connect, try again with the engine running. Some vehicles communicate better that way. Also check for bent pins in the port, especially on older cars where something has been plugged in many times.
Step 3: Read and Write Down Every Code
Before you touch the clear button, write everything down or take a photo of the screen. Once you clear, some of this information is gone.
How codes are built
An OBD2 code has one letter and four digits, like P0420 or P0171.
- First letter: P for powertrain, B for body, C for chassis, U for network communication.
- First digit: 0 is a generic code shared across makers. 1 is usually a manufacturer-specific code.
- Remaining digits: point to the system and the specific fault.
Stored versus pending
A stored or confirmed code has turned on the light. A pending code means the computer saw a problem once but hasn’t confirmed it yet. Pending codes are early warnings. They’re worth writing down too.
Look up each code for your exact year, make and engine. A generic description is a start. Manufacturer service information and technical service bulletins are better, because the same code can have different common causes on different engines.
Check the readiness monitors
While you’re connected, look at the monitor status screen. Each monitor shows whether a system self-test has finished since the last time codes were cleared. Incomplete monitors on a used car you just bought can mean someone cleared codes recently. That’s worth knowing before the warranty or return window runs out.
Step 4: Use the Freeze Frame Data
Freeze frame is a snapshot of sensor readings at the moment the code set. Many people skip it. It’s one of the most useful things a cheap scanner shows.
- Engine coolant temperature: tells you if the fault happened cold or warm.
- Engine speed and vehicle speed: idle, cruising or accelerating.
- Engine load: light cruising or working hard.
- Fuel trims: how much the computer was adding or removing fuel.
Say you have a lean code. If the freeze frame shows it set at idle with high fuel trims, a vacuum leak is a strong candidate. If it set under heavy load at highway speed, low fuel delivery moves up the list. Same code, different direction.
If your tool shows live data, watch the same readings with the engine running. Compare them to the freeze frame. A reading that looks normal now but was off when the code set tells you the fault comes and goes.
Step 5: Diagnose Before You Buy Parts
A code names a circuit or a condition. It rarely names a failed part. This is where people throw money away. An oxygen sensor code can come from an exhaust leak, a wiring problem or a fuel issue, not just a bad sensor.
- Start with the basics: loose gas cap, disconnected hoses, damaged wiring, unplugged connectors.
- Check for recalls and service bulletins related to the code.
- If you have several codes, look for a common cause. A single vacuum leak can set lean and misfire codes together.
- Fix the first code that appeared, or the one most likely to cause the others.
- Only then replace a part, and buy it for a confirmed reason.
Listen before you buy parts. The scanner is the first clue, not the verdict.
Keep a simple log for each car. Date, mileage, codes, freeze frame notes and what you did. Over a few years that log becomes the most useful tool in the garage. Patterns show up that you’d never remember otherwise.
Step 6: Clear Codes the Right Way
Clearing codes turns off the light. It doesn’t fix anything. If the problem is still there, the light will come back.
- Clear only after you’ve written everything down and made a repair.
- Clearing resets the readiness monitors. Your car may fail an emissions test until it completes a full drive cycle.
- Drive normally for several days, mixing city and highway, then recheck monitors before an inspection.
- Check again for pending codes after a few drives. A returning pending code tells you the repair didn’t take.
Disconnecting the battery also clears codes on many vehicles. It can reset radio presets, idle learning and other settings too. The scanner is the cleaner way.
One more habit: unplug the scanner before you drive off. A tool dangling under the dash can catch your foot, and some adapters keep drawing power from the battery while the car sits.
Related checklistCheck Engine Light Flashing? Pull Over First, Then This
Tow or go?
| What you notice | Likely cause | Verdict |
|---|---|---|
| Steady light, evap leak code, car drives normally | Loose or worn gas cap, small evap leak | Go: check the cap, retest later |
| Steady light, lean or sensor code, slight roughness | Vacuum leak, sensor or wiring fault | Soon: diagnose within days |
| Flashing light, misfire codes, shaking | Active misfire that can overheat the converter | Stop: reduce load, have it towed or checked |
| Light with overheating or oil pressure warning | Serious engine problem | Stop: shut it off safely |
When to hand it to a shop
- The check engine light is flashing, or the car runs badly with the light on.
- The code points to a module your scanner can’t reach, like ABS, airbag or transmission.
- You’ve fixed the obvious causes and the same code returns.
- The repair needs programming or a relearn your tool doesn’t support.
- Codes point to fuel system leaks or anything you can smell as raw fuel.
FAQ
Are cheap Bluetooth OBD2 adapters any good?
Many work well for reading and clearing engine codes and viewing live data through a phone app. Quality varies. Some drain the battery if left plugged in, so unplug it when you’re done.
Can a scanner damage my car?
Reading codes is low risk. Avoid unknown programming or coding features in apps unless you know exactly what they do.
Why did the light go off by itself?
Some faults that stop happening will turn the light off after several good drive cycles. The code often stays in history. It’s still worth looking up.
Do parts stores read codes for free?
Many do. Owning your own scanner lets you see pending codes, freeze frame and monitors, and check again after a repair.
Pit-Stop Summary
The 30-Second Version
- Plug the scanner into the port under the dash and turn the key to run.
- Write down every stored and pending code before clearing anything.
- Check freeze frame data to see when and how the fault happened.
- Look up the code for your exact vehicle and check the simple causes first.
- Clear codes only after a repair, then recheck after a few drives.